Skip to content

Grady and I have been working on a script that takes in a large set of pictures of a sheet of holographic glitter, where a picture is taken at every location of a small white box moving along a monitor across from the glitter sheet. The graph we created shows the color of a single glitter pixel when the white box is at that location on the monitor. From this data, I combined the graph with the script I wrote a few weeks ago and created a graph that shows the same thing, just displaying the closest monochromatic wavelength to the RGB value shown and recording that value.

Any photo where the pixel we selected was not lit was not used for this process, as well as any photo where the pixel was fully saturated, or not saturated to at least 15%.

We plan to use these lines to compute a various set of angles that we need, along with the wavelength, to determine the groove spacing of the diffraction grating on our specific holographic glitter sheet.

I spent a good amount of time in the last week planning and fine-tuning what would be best for the models (database tables) and how they need to be able to interact with each other. I also have been working on getting the project set up on the server and the web app moved over onto the server. 

Below shows one of my diagrams of keys (primary and foreign) that I will be using in the models- this took a couple of re-dos in order for me to consider it efficient, but I learned some really important lessons about relations between tables and had to seriously think through how I will want to be accessing and changing these databases through the web app.

Having never worked with a database before, let alone a framework like Django, I really have had to dedicate a great deal of time to understanding how different elements work with one another, and how to configure the whole set-up so it actually works. Not that I have completely mastered anything, or that I’ve done every Django and SQL tutorial out there (just... most of them), but I really am feeling more confident about using Django and creating a back-end for the web app that I ever anticipated.

A couple successes & updates in the last week:

Dr. Pless suggested an addition to the web app (for right now, as the database is not up yet) - storing the photo that was last taken on the app as the overlay for the next photo. I used the LocalStorage JavaScript API, which I had already used to display the photo after it was taken on the next page, to make this happen and while it will only show the last photo you took using the web app, it’s still a pretty cool thing until we can get the database up and running!

The photo on the left shows the overlay in action- the blurriness is due to my shaking hand in trying to take the screenshot, but it was really great to see a sneak peek of what the web app will eventually become. The photo on the left shows the page after the photo is taken, displaying the photo with the choice to hold down to save to your camera roll along with sharing on social media and other options that I haven’t worked on yet.

I’ve been working on the plans for the flow as well as appearance of the site and have been drawing out my ideas, so there is a plan for the front-end! I’m currently more focused on the back-end, but when the time comes, I’m really excited to start working on giving Project rePhoto the eye-catching, modern look it deserves!

We’re still trying to come up with a Project rePhoto tagline- a couple of strong ones so far have been “chronicle change in your world” and “track what you care about”, and I’d love to hear more! There’s sticky notes by my desk if you ever think of an idea!

I would really appreciate any feedback that anyone has on what I’ve done so far; thanks for reading and happy Thursday!

This past week, I have been working on solving for the gaussian which fits the intensity plots of my glitter pieces, and using this to solve for the center of the receptive field of the glitter. Below is an example of an intensity plot of a centroid:


Below are the equations I am using to write the optimization function to solve for the receptive field. Here I am computing the integral of the response of a piece of glitter at every location on the monitor, where I(x,y) is a binary of whether the monitor is lit or not at each location:

Right now, I am solving this using the circular gaussian with a single sigma, and I spent a few days working through writing the optimization function. Yesterday I was able to write it in a way that speeds it up (each iteration is looking at 200 frames and ~700 centroids, so it was very slow).

My next step is to work on analyzing the final error that I am getting and looking at the optimal solution for the center of the receptive field and the sigma value (I am getting a solution, but have not spent too much time trying to understand its validity).

1. Nearest Neighbor Classifier

NN (Nearest Neighbor Classifier):

This classifier has nothing to do with Convolutional Neural Networks and it is very rarely used in practice, but it will allow us to get an idea about the basic approach to an image classification problem.

One of the simplest possibilities is to compare the images pixel by pixel and add up all the differences. In other words, given two images and representing them as vectors I1,I2 , a reasonable choice for comparing them might be the L1 distance:

...continue reading "kNN, SVM, Softmax and SGD"

In the past few days I've been working on finding away to approximate the wavelengths of lights in photos. This isn't technically possible to do with complete accuracy, but I was able to write a script that can approximate the wavelength with some exceptions (mentioned later in the post).

Using data from a chart that has the XYZ colorspace of all monochromatic wavelengths of visible light, I was able to convert my RGB image to XYZ colorspace and find the closest wavelength value to the XYZ values of the pixel. I've produced a histogram of this script in action on an entire image, however I also produced a smaller version of the script that can be used as a function and convert one pixel at a time from an RGB value to wavelength value.

Here is the histogram of wavelengths of light found in the photo:
Here is a histogram of the hues present in the same photo:

As you can see, there are a few issues with the wavelength approximations. Some color hues (most notably pinks and purples) cannot be produced using a single wavelength. My script matches the RGB value of the pixel to the closest monochromatic wavelength, and therefore colors that cannot be created with one wavelength are approximated to the closest component wave, which can explain why there are larger amounts of blue and red light shown in the wavelength histogram.

This behavior seems fairly consistent across images, but in the future I might have to figure out a way to approximate these more complex colors if we find that more accuracy is needed. For now this script gives us an accurate enough idea of the wavelengths of light produced in the image in order to begin using holographic light diffraction grating equations to approximate other information such as the angle of the incoming wavelength before the diffraction occurred.

View Data

These images are labeled satellite image chips with atmospheric conditions and various classes of land cover/land use. Resulting algorithms will help the global community better understand where, how, and why deforestation happens all over the world - and ultimately how to respond.

...continue reading "Training Model use Dataset with Multi-Labal"

The last week has seen a few dozen changes and improvements to the flow and functionality of the web app for Project rePhoto. Some changes of note: I added the ability to create new projects and subjects (requiring one subject with one entry to be created when the project is), the overlay will always be the first photo that was uploaded to the subject, and you can upload photos to a subject as a URL, which will then be converted to an .png image by a Python script I wrote this week.

Here’s a diagram I made to map out the flow of the web app, which is reflected in the current version of the web app (though it is a skeleton version without any backend functionality): rePhoto-flow

I also spent a decent amount of time earlier this week taking a deeper look at and getting more comfortable with Django. This is my current plan for the file management for the functionality of the web app: rePhoto-file-mgmt

I’ve also been working, without too much luck, on saving the photos locally on the devices they are taken on, and am working today on getting the “hold down to save” functionality working (which would be clunky but users are relatively familiar with doing this on their phones).

A few questions that I’ve been working towards answering:

  • When making the choice to require each new project to have at least one subject, with one entry, I thought about projects like RinkWatch (a collection of ice rinks around North America) and Scenic Overlooks (a compilation of views from various hikes), which have had a lot of subjects, but very few entries. Should we require the user to add an entry to each subject when it is created, even though we would no longer be able to allow for projects like RinkWatch?
  • Instead of providing a list of subjects, which would require our users to know the exact name of the subject they’re looking to add to, I thought it might be useful to use an Open Street Maps API, like the one that already exists in the View Projects section of the rePhoto website, to allow users to be able to view the subjects on a map before choosing one to contribute to. Kartograph (https://kartograph.org/) also seems to be another option, so I’m going to do some research in the next week about which one fits the goals of our project better, and would love any input on which might be best or why Open Street Maps was chosen for the Project rePhoto site a few years ago.
  • Is it best to keep the Projects -> Subjects -> Entries pipeline? Otherwise, we could use tags to connect subjects to each other, which would serve the organizational purpose of projects. Why I’m excited about tags- many people, across geographic boundaries, can see each other’s work; for example, with a “home-improvement” tag, someone in Alaska and another in Brazil could both be building outdoor fireplaces, and get ideas from watching the evolution of each other’s projects. My only concerns- if a user is not required to put any tags on their subjects, we could have a lot of subjects that wouldn’t be tied to anything, making the process of organization and re-finding subjects a bit more tedious.

I’d love any feedback on what I’ve done and what should be done next, and happy Friday! 🙂

I tried to creating my own dataset from internet image resources this week, and it works well.


Get a list of URLs
Go to Google Images and search for the images you are interested in. The more specific you are in your Google Search, the better the results and the less manual pruning you will have to do.

Now you must run some Javascript code in your browser which will save the URLs of all the images you want for you dataset. Press Ctrl+Shift+J in Windows/Linux and Cmd+Opt+J in Mac, and a small window the javascript 'Console' will appear. That is where you will paste the JavaScript commands.

You will need to get the urls of each of the images. You can do this by running the following commands:

urls = Array.from(document.querySelectorAll('.rg_di        .rg_meta')).map(el=>JSON.parse(el.textContent).ou);
window.open('data:text/csv;charset=utf-8,' + escape(urls.join('\n')));

...continue reading "Creating Your Own Dataset from Google Images and Training a Classifier"

We've been playing around with different pooling strategies recently -- what regions to average over when pooling from the final convolutional layer to the pooled layer (which we sometimes use directly in embedding, or which gets passed into a fully connected layer to produce output features). One idea that we were playing with for classification was to use class activation maps to drive the pooling. Class activation maps are a visualization approach that visualize which regions contributed to a particular class.

Often we make these visualizations to understand what regions contributed to the predicted class, but you can actually visualize which regions "look" like any of the classes. So for ImageNet, you can produce 1000 different activation maps ('this is the part that looks like a dog', 'this is the part that looks like a table', 'this is the part that looks like a tree').

The CAM Pooling idea is to then create 1000 different pooled features, where each filter of the final conv layer is pooled over only the 'active' regions from the CAM for each respective class. Each of those CAM pooled features can then be pushed through the fully connected layer, giving 1000 different 1000 element class probabilities. My current strategy is to then select the classes which have the highest probability over any of the CAM pooled features (a different approach would be to sum over all of the probabilities for each of the 1000 CAM pooled features and sort the classes that way -- I think this approach to how we combine 'votes' for a class together is actually probably very important, and I'm not sure what the right strategy is).

So does this help? So far, not really. It actually hurts a bit, although there are examples where it helps:

The following pictures show examples where the CAM pooling helped (top) and where it hurt (bottom). (In each case, I'm only considering examples where one of the final results was in the top 5 -- there might be cases where CAM pooling improved from predicting the 950th class to 800th, but those aren't as interesting).

In each picture, the original query image is shown in the top left, then the CAM for the correct class, followed by the top-5 CAMs for the original feature (CAMs for the top 5 predicted class), and then in the bottom row the CAMs for the top-5 CAMs for the classes predicted by the CAM pooled features.

Original index of correct class: 21
CAM Pooling index of correct class: 1


Original index of correct class: 1
CAM Pooling index of correct class: 11

More examples can be seen in: http://zippy.seas.gwu.edu/~astylianou/images/cam_pooling

One of the fundamental challenges and requirements for the GCA project is to determine where water is especially when water is flooding into areas where it is not normally present.  To this end, I have been studying the flooding in Houston that resulted from hurricane Harvey in 2017.  One of the specific areas of interests (AOI) is centered around the Barker flood control station on Buffalo Bayou.

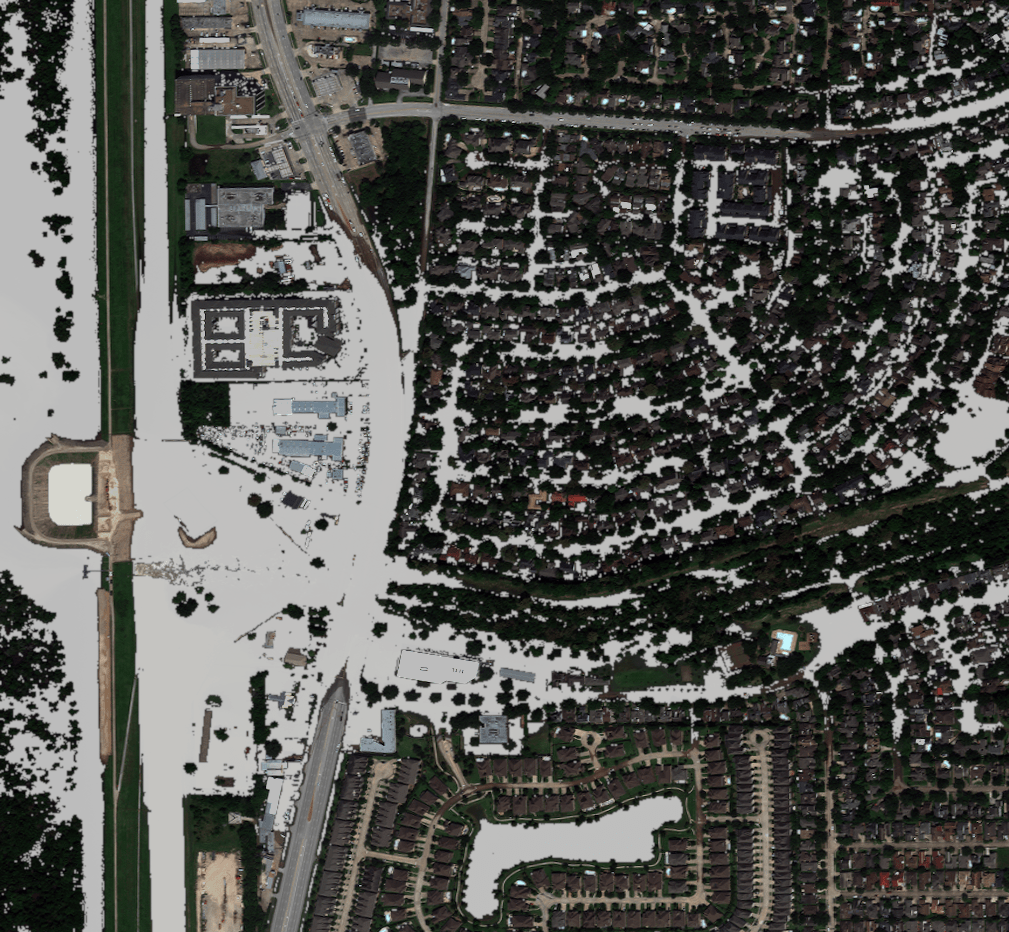
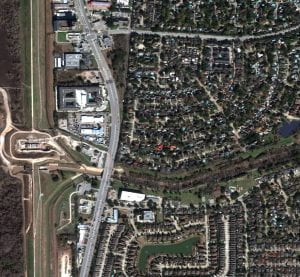
To get an understanding of the severity of the flooding in this area, this is what the Barker flood control station looked like on December 21, 2018...

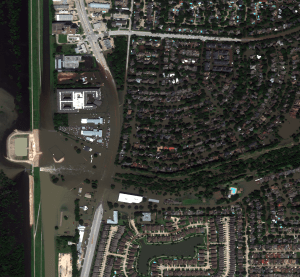
And this is what the Barker flood control station looked like on August 31, 2017...

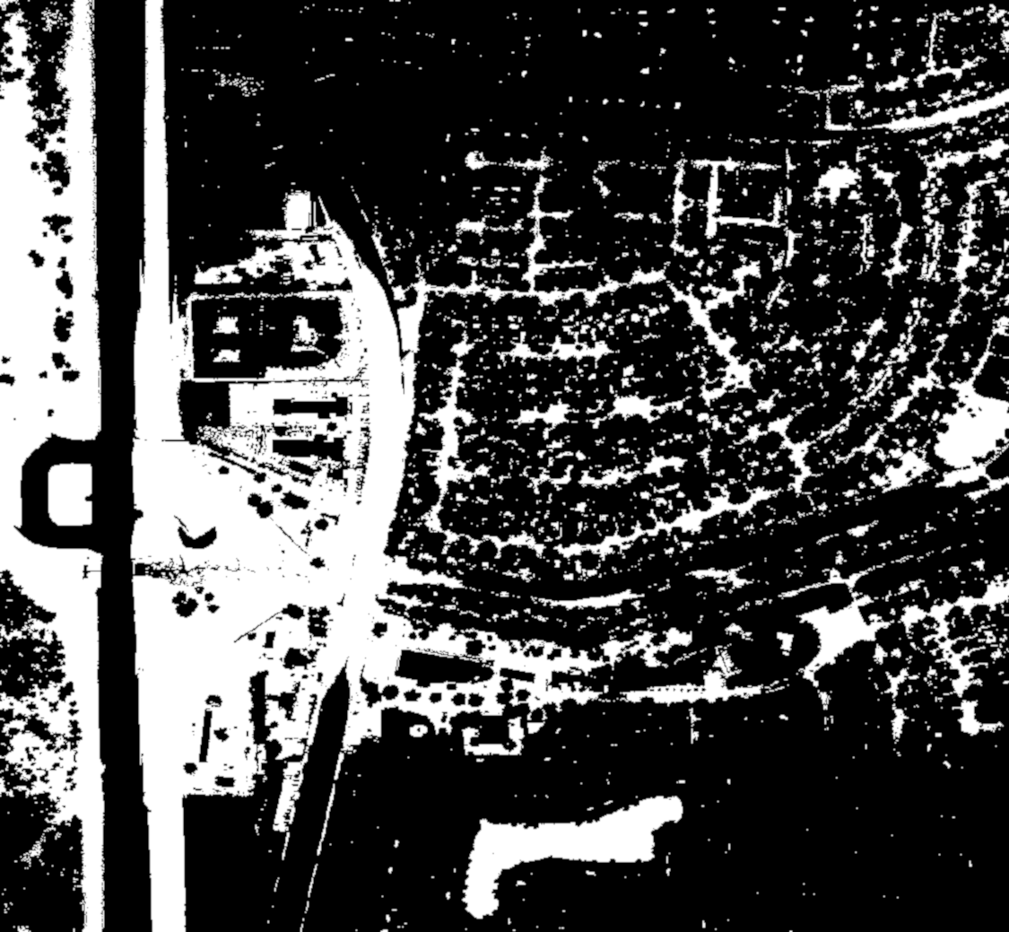
Our project specifically explores how to determine where transportation infrastructure is rendered unusable by flooding.  Our first step in the process is to detect where the water is.  I have been able to generate a water mask by using the near infrared band available on the satellite that took these overhead photos.  This rather simple water detection algorithm produces a water mask that looks like this...

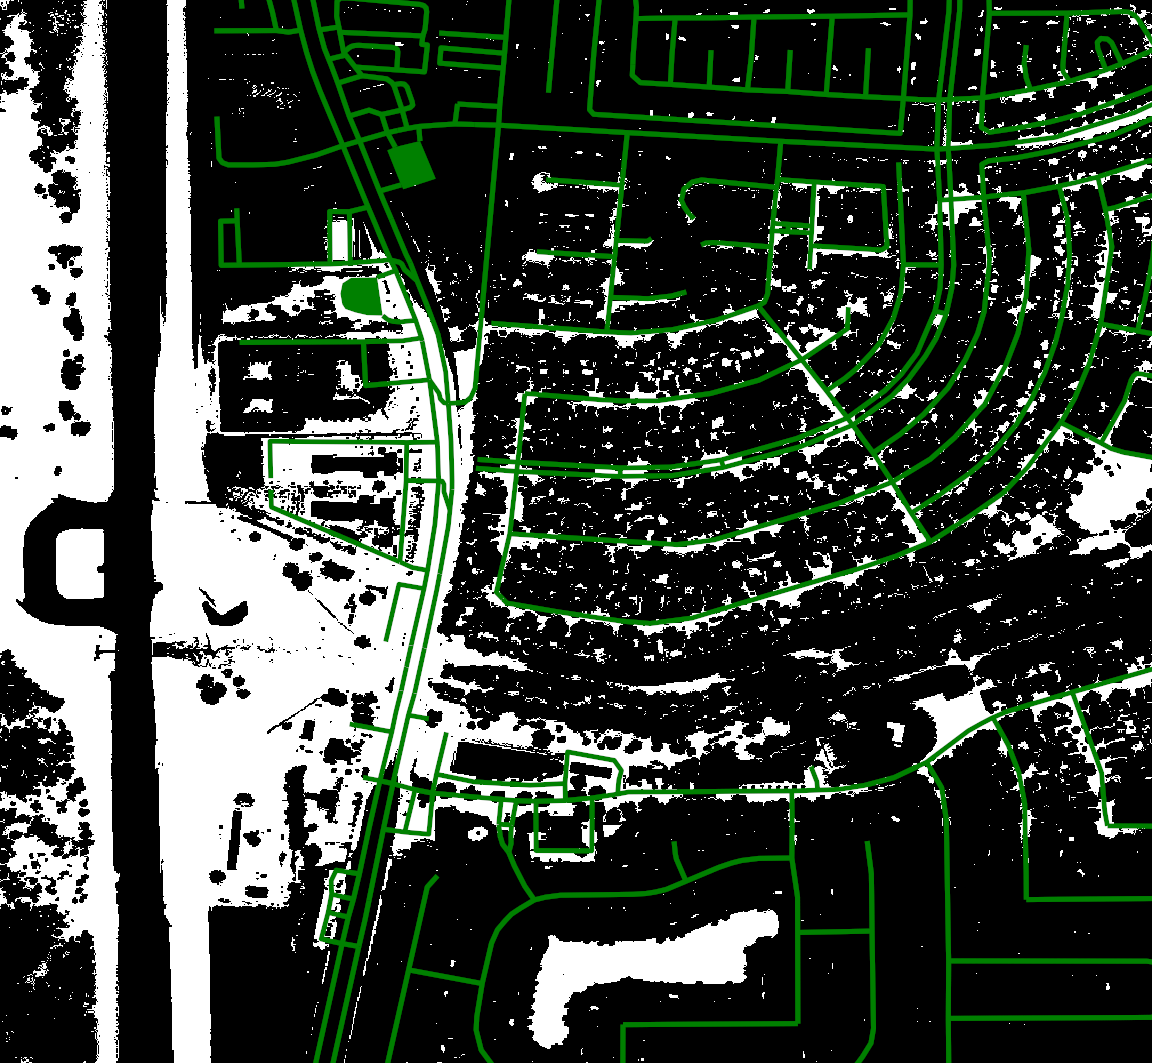
If the mask is overlayed onto the flooded August 31, 2017 image, it suggests that this water detection approach is sufficient for detecting deep water...

There are specific areas of shallow water that are not detected by the algorithm; however, parameter tuning increases the frequency of false positives.  There are other approaches that are available to us; however, our particular contribution to the project is not water detection per se and other contributors are working on this problem.  Our contribution is instead dependent on water detection, so this algorithm appears to be good enough for the time being.  We have already run into some issues with this simplified water detection, namely that trees obscure the sensor which causes water to not be detected in some areas.

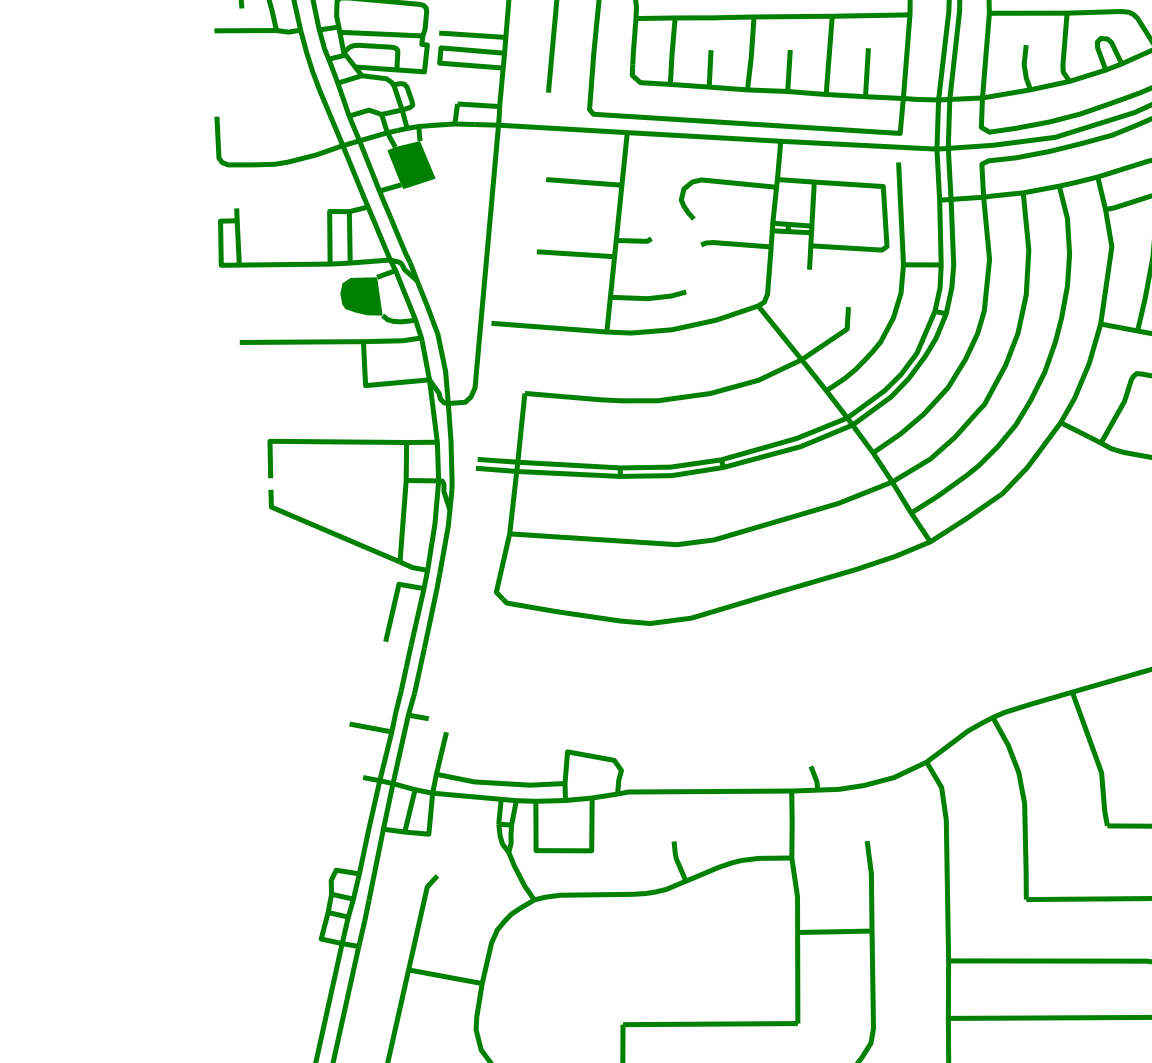
Besides water detection, our contribution also depends on road networks.  Again, this is not a chief contribution of our project and others are working on it; however, we require road information to meet our goals.  To this end, we used Open Street Maps (OSM) to pull the road information near the Barker Flood Control AOI and to generate a mask of the road network.

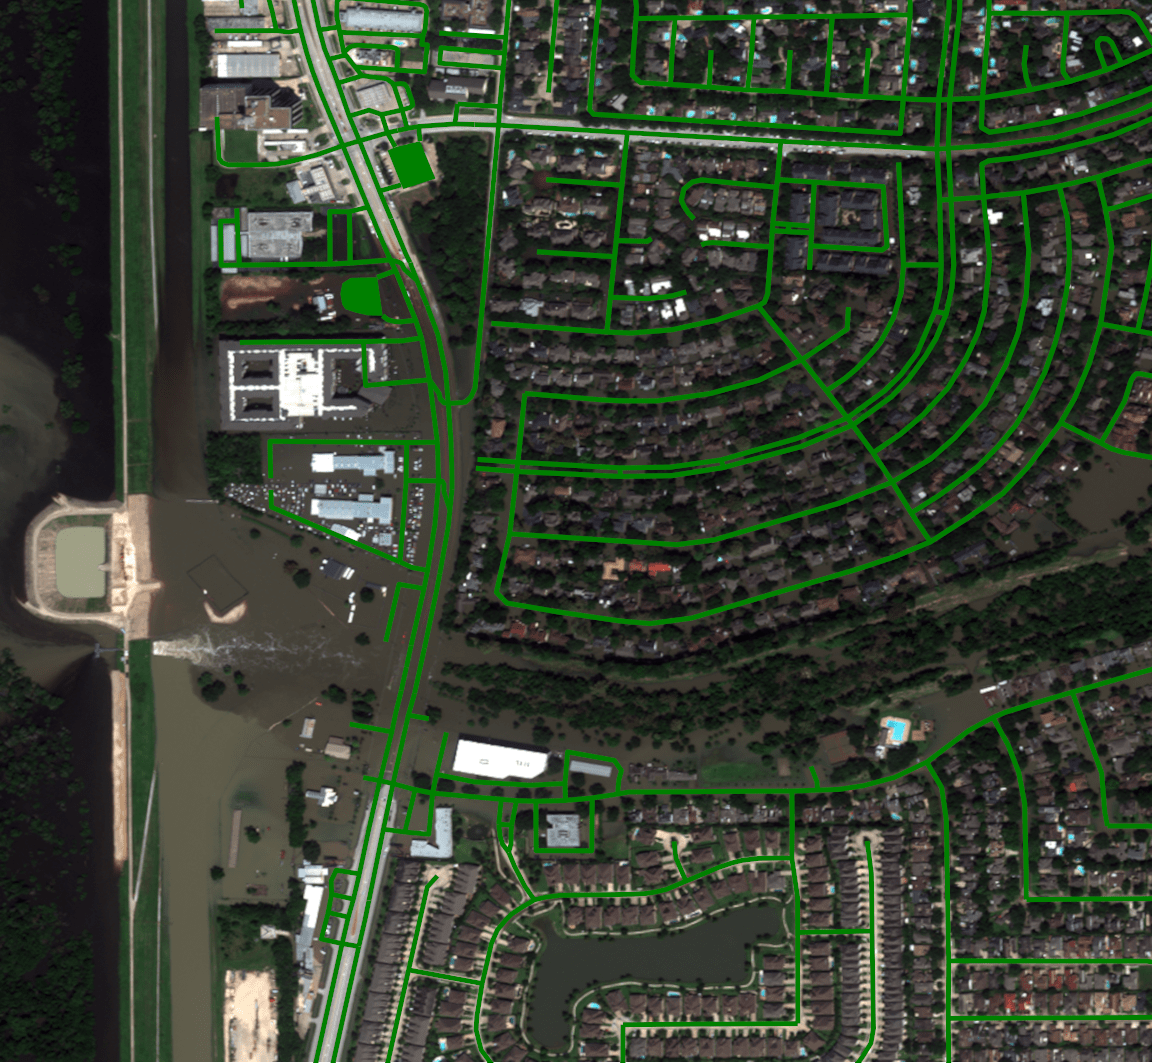
By overlaying the road network onto other imagery, we can start to see the extent of the flooding with respect to road access.

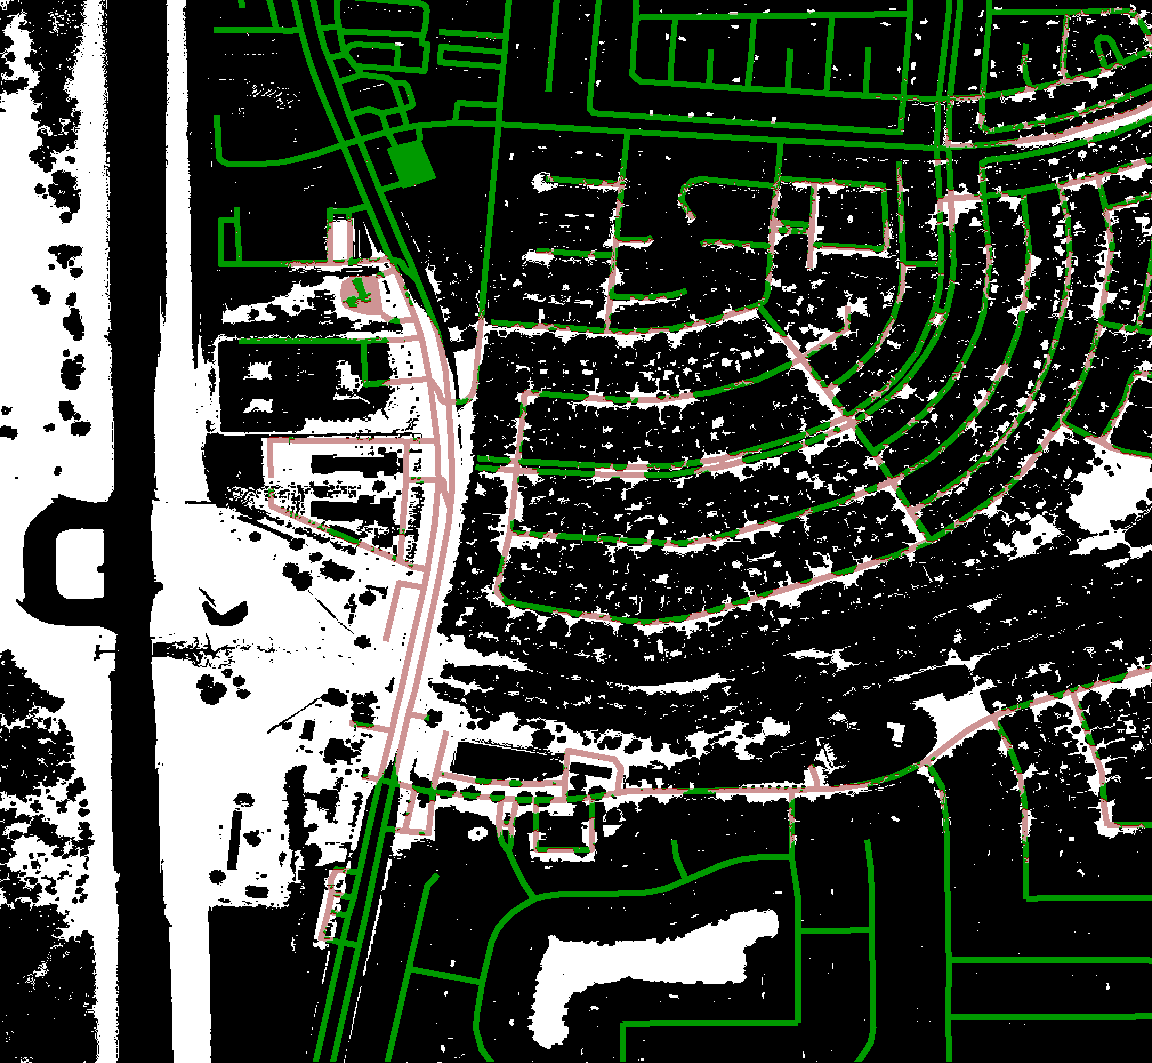
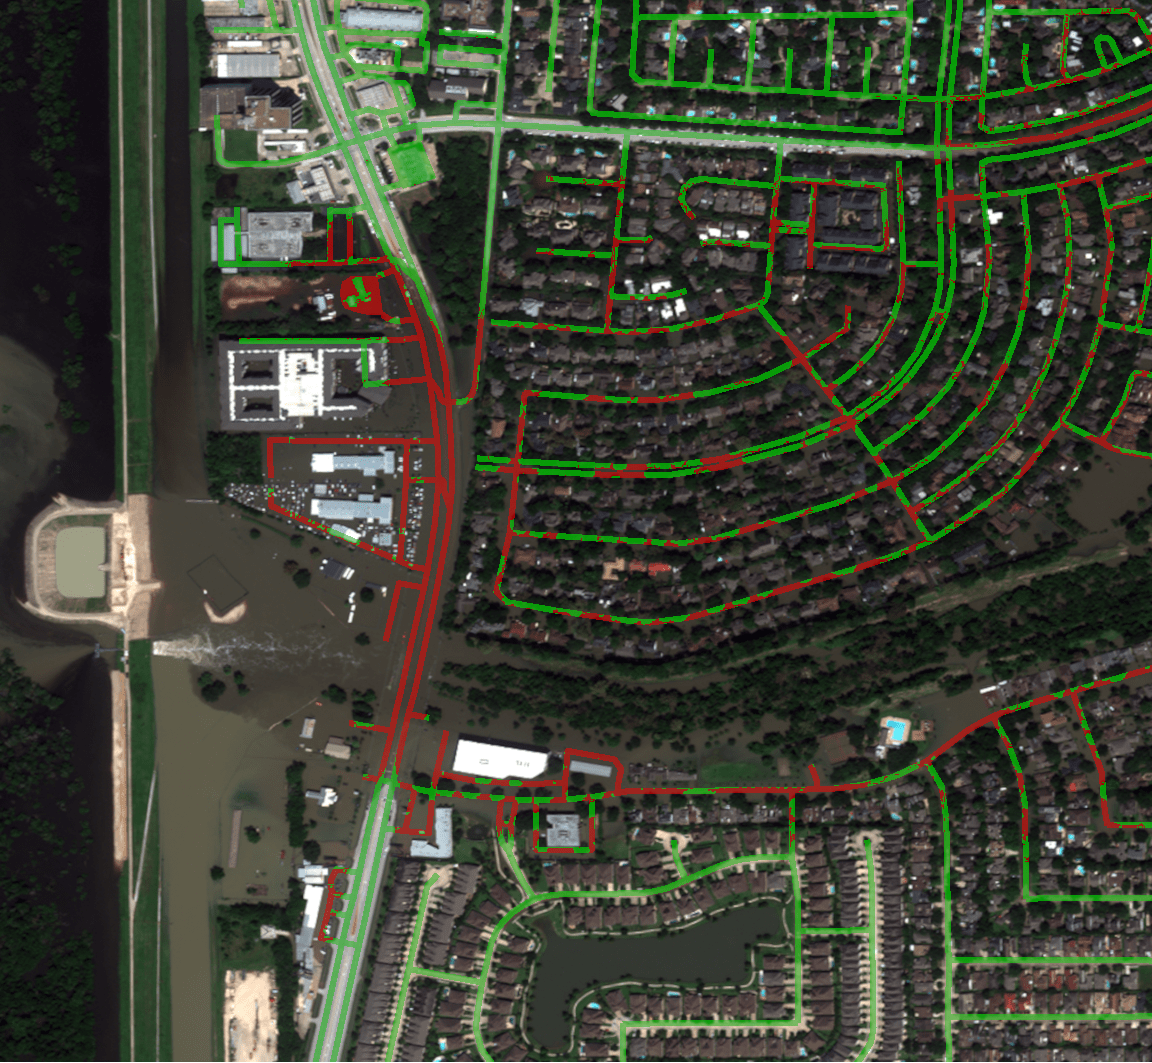
Our contribution looks specifically at road traversability in flooded areas, so by intersecting the water mask generated through a water detection algorithm with the road network, we can determine where water covers the road significantly and we can generate a mask for each of the passable and impassible roads.


The masks can be combined together and layered over other images of the area to provide a visualization of what roads are traversable.

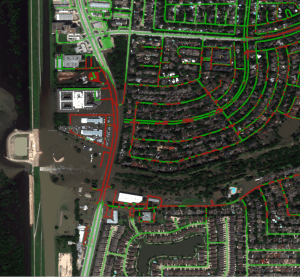
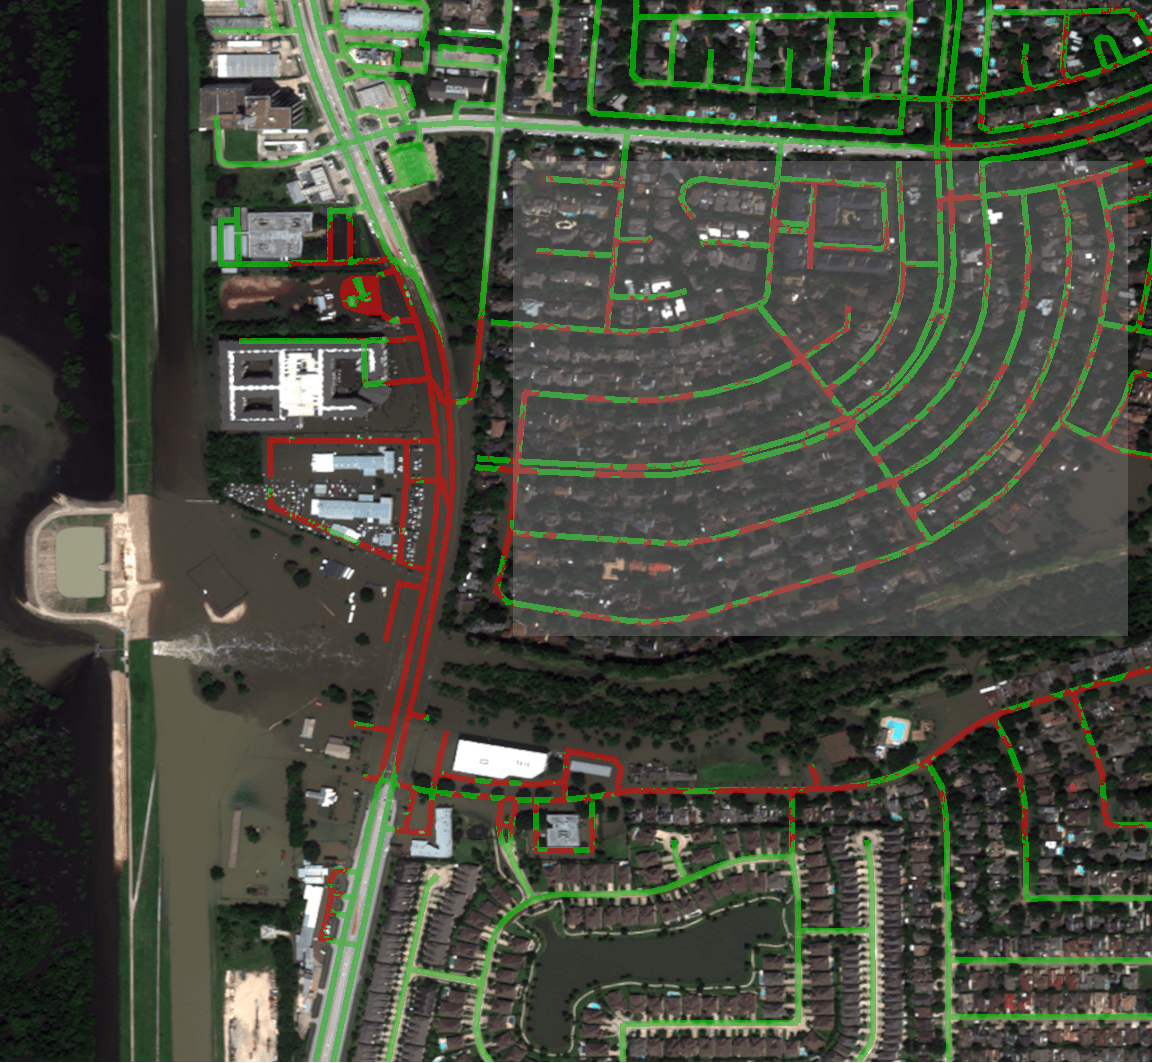
The big caveat to the above representations is that we are assuming that all roads are passable and we are disqualifying roads that are covered with water.  This means that the quality of our classification is heavily dependent on the quality of water detection.  You can see many areas that are indicated to be passable that should not be.  For example, the shaded box in the following image illustrates where this assumption breaks down...

The highlighted neighborhood in the above example is almost entirely flooded; however, the tree cover in the neighborhood has masked much of the water where it would intersect the road network.  There is a lot of false negative information, i.e. water not detected and therefore not intersected, so these roads remain considered traversable while expert analysis of the overhead imagery suggests the opposite.

We are also combining our data with Digital Elevation Models (DEM) which are heightmaps of the area which can be derived from a number of different types of sensor.   Here is a heightmap from the larger AOI that we are studying derived from the Shuttle Radar Topography Missions (SRTM) conducted late in the NASA shuttle program.  This is a sample from the SRTM data of the larger AOI we are studying...

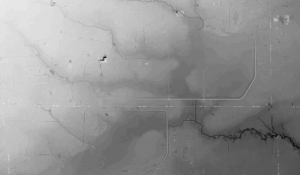
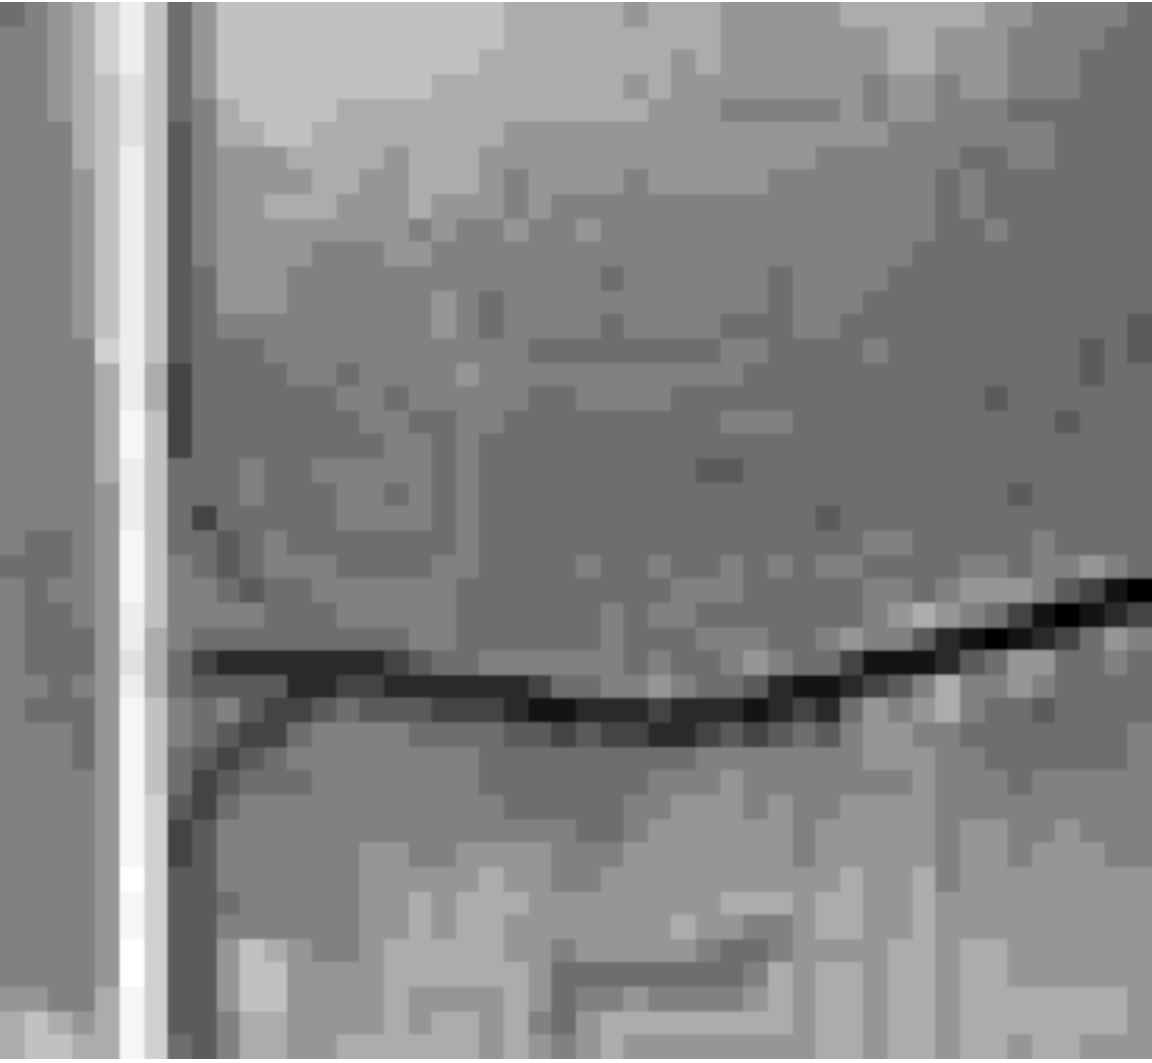
Unfortunately, the devil is in the details and the resolution of the heightmap within the small Barker Flood Control AOI is very bad...

A composite of our data shows that the SRTM data omits certain key features, for example the bridge across Buffalo Bayou is non-existent and that our water detection is insufficient, the dark channel should show a continuous band of water due to the overflow.

The SRTM data is unusable for our next steps, so we are exploring DEM data from a variety of sources.  Our goal for the next few days is to assess more of the available and more current DEM data sources and to bring this information into the pipeline.