Embroidery Tutorial
By Esther Stoppani, Intern with Campaign GW
Hi! I’m Esther, one of the Campaign GW interns. Embroidery is one of my favorite hobbies, and I know that a lot of people want to learn how to do this craft, so I offered to create a little beginner’s guide to embroidery! It’s a lot simpler than people tend to think and is a great way to repurpose old clothes.
-What will you need?
An embroidery hoop
An embroidery needle
Embroidery floss: comes in a variety of colors, it’s the same stuff that comes in a lot of “friendship bracelet” kits
Fabric: which can be pretty much whatever you have on hand, but I would avoid super tightly woven fabric and stretchy materials
Scissors
-The basics
To get started with embroidery, you only need a few materials.
Your embroidery hoop has two separate pieces. Lay your fabric over the inner loop so that the outer loop can be tightened around it, holding the fabric in place. You want the fabric to be taut, so stay away from stretchy materials like spandex that might warp from stretching.
If you’re working off a pattern or design, use an erasable or water-soluble pen to draw the design on. I would also recommend starting with embroidery floss that is not metallic or sparkly. These types of thread are harder to work with, especially when you’re first starting out.
Regular embroidery floss is typically 6-stranded, so you’ll want to separate out 2-4 strands, depending on how large you want your stitching to be. I almost always use 2 strands and vary my stitch types to change the size. Thread your needle and leave a tail that’s about 2 inches long. On the longer (working) thread, tie a knot at the end of the string. Now you’re all set up to start stitching!
-The simplest stitch
This one is probably the easiest stitch in embroidery. To create a straight stitch, push your needle up through your fabric from underneath. Pull your needle all the way through so the string is taut. Then, push your needle back down through the fabric in a different spot. This creates a small, straight line of stitching. By repeating this process, you can fill in the space between your stitches and create shapes. I use straight stitches mostly for filling in areas of color, because these stitches don’t create as much texture or variety as some of the other stitches.

-Back stitch
This starts out with a single straight stitch. Once you’ve created a single straight stitch, your needle will be back under the fabric. When you bring your needle back up through the fabric, you want to come up one stitch-length from the hole you came through. I usually make my stitches about ¼ inch long, but it depends on the design you’re making. Pull the string taut, then go back down through the hole at the end of the previous stitch to connect the two. These stitches create uniform lines and are great for outlines and letters.

-Stem stitch
A stem stitch is very similar to a back stitch, but instead of coming up one stitch-length from your previous stitch, you will bring your needle up just to the side of the hole you came through. Pull the string taut and push the needle back down one stitch-length away. This will create a staggered line of disconnected single stitches. I don’t typically use this stitch type a lot, but it can be helpful when filling in areas.

-Split stitch
Start again with a single straight stitch. This time, when you bring your needle up through the fabric, do this in the middle of your previous stitch, so that the two threads of the stitch separate around your needle. Pull the string taut. You now have a single stitch with thread coming up through the middle of it. Continue along your line and push the needle back down through the fabric. Repeat. This creates a very textured stitch with little V’s in it. I like to use this stitch for outlines and decorative borders.

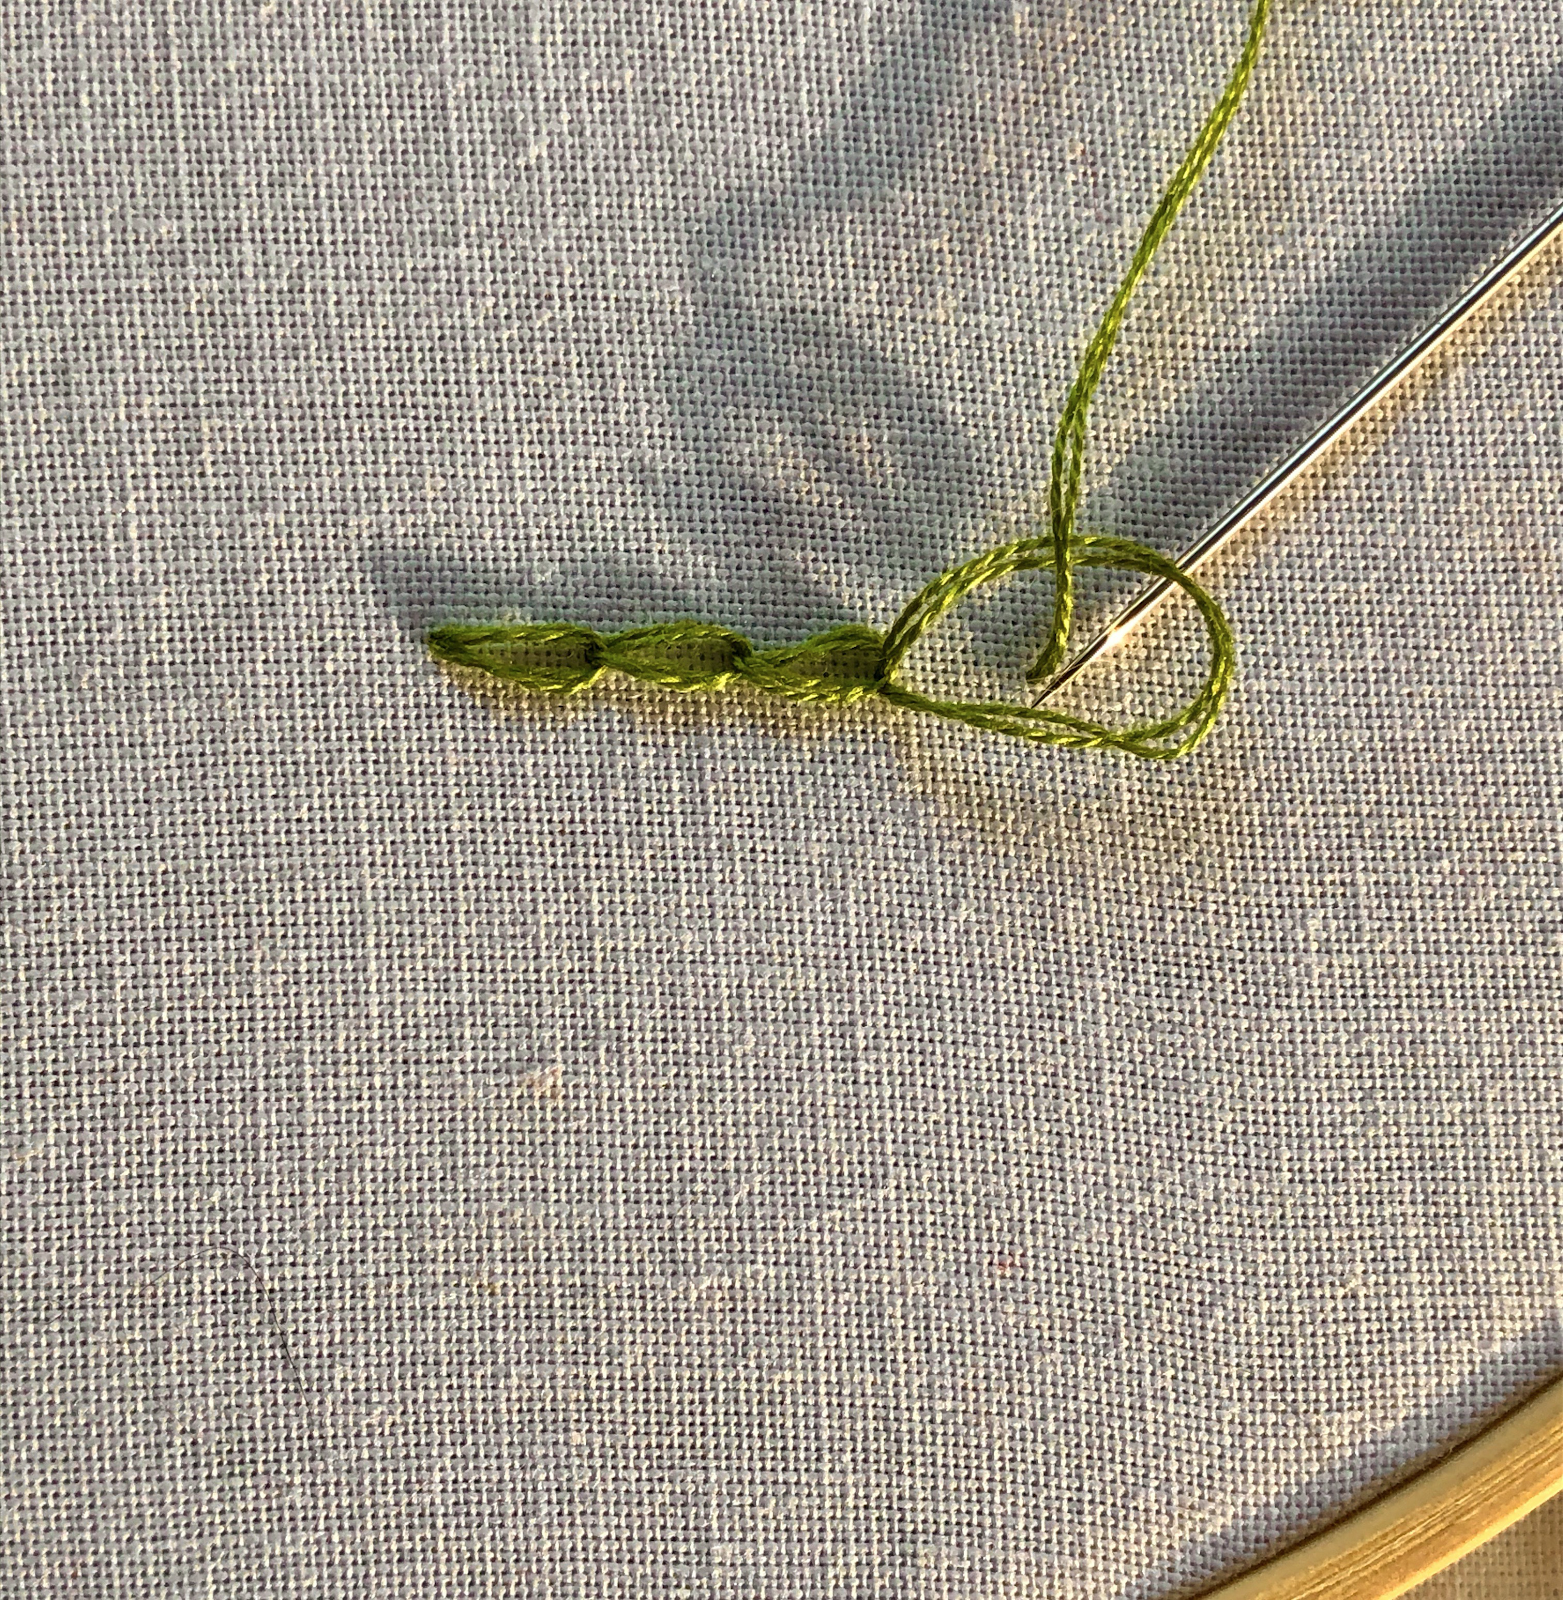
-Chain stitch
To start a chain stitch, bring your needle up through the fabric and pull the thread taut. Bring your needle back down through the same hole you just came up through, but don’t pull the thread taut! Leave a loop of thread sticking up from the fabric. One stitch length away, bring your needle back up through the fabric. Take the loop you just created and bring your needle up through it. Now, pull the string taut. This should make the loop get smaller and lay flat. Bring your needle back down through the fabric close to where you brought it up. You can change the shape of the loop, which is now your stitch, by gently pulling the sides. Repeating this stitch will give you a very textured, chain-shaped stitch. I love the way this stitch looks, and it’s pretty simple once you get the hang of it. Doing a single chain stitch is also a fun way of making leaves and petals on floral designs.
-French knot
This stitch is a little trickier, but it’s an important one. To start a French knot, bring your needle up through your fabric. Pull taut. Then, push the tip of the needle back down through the fabric just to the side of where you brought it up. Don’t push the needle all the way through! Instead, tip the needle back up through the fabric a couple millimeters from where you just pushed it down. Again, don’t pull the needle all the way through. At this point, you should have your string sticking up towards you from the fabric, and your needle should be tucked through the fabric so that both ends are above the fabric (the middle is below). Gently take the long loop of thread and wind it around the needle 2-3 times. Pull the thread a bit to get it fairly tight around the needle. Slide these loops down the needle so that they rest next to where it comes up through the fabric. Using your nail to hold the thread in place, gently pull your needle all the way through. Pull taut. You should now have a small knot at the base of the thread where it comes up through the fabric. If the knot is loose, pull the string more and push the knot towards the fabric. To finish off the knot, push your needle back down through the center of the knot. If your knot was a little messy, you can try to tuck any loose parts in during this final step. French knots can be difficult, but find the way to make them that works best for you! I like doing it this way because if you want to make flowers, wrapping the thread around the needle 5-7 times instead will create a longer knot that looks like the petal of a rose. Making several of these and tucking them together is my favorite way to make roses.

-Tying off your stitch
When you want to switch thread colors or are moving to a different area of your fabric and don’t want to waste thread, you tie it off. After you finish your stitches, your needle will be underneath the fabric. Keep the needle and thread on this side of the fabric. Use your needle to tuck your thread under a nearby stitch, and then tie a double knot. You want to make sure the knot is secure before cutting the thread.
Now you know how to make some of the main stitches for embroidery, but what will you do with them?
Finding a pattern online and following it is a great place to start. This way you have instructions and a clear idea of what your design should look like. You can also just stick to practicing the different stitches until you feel comfortable. If you feel good about these stitches, you can try creating your own design or learning new stitches. Embroidery is great for making patches (I like to use felt as my fabric for these), covering up holes or stains in older clothes that you don’t want to throw out, and just adding some personalization to your clothes.
A couple tips and tricks before you go
You can always “undo” your stitches. Whether with a seam ripper or by just pulling the stitches out, your work can be undone if you don’t like how it turns out.
Trim the ends of your threads. All of your threads will end on the backside of your design, and it can be tempting to let it get messy since it won’t be seen. The more loose ends you have, the more likely it is for your floss to get tangled. Avoid this issue entirely by always trimming your strings after tying them off.
Don’t sit next to someone, you might poke them in the eye. When you’re embroidering, you have to pull the thread through with your needle, which means that you’re constantly reaching your arm far out to the side with a needle in your hand. You can probably see where this is going. I’ve poked enough friends to know not to sit too close when I’m working (or at least to have them sit on my left since I’m right-handed).
Always pull gently on the string. Trying to work fast and pulling the thread through quickly will lead to tangles and knots, which get frustrating. It’s a lot easier if you just slow down.